9.12.18

[Visual Studio] How to Create a DB Project on Visual Studio


1. Right click on the Solution, and click "Add New Project" -> Select "SQL Server Database Project"


2. Add a folder named "dbo" for table .sql files, and you can also add corresponding folders like "Scripts", "SeedData", or "StoreProcedures".


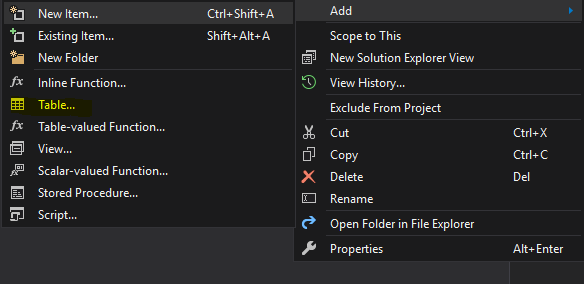
3. Add a table in the dbo folder

4. Design DB schema, you can either use interface to create the schema or use SQL to set it up.

5. Publish the database
When everything is set up as you desired, it's time to publish the database. In VS 2017, the publishing process can easily be done by some simple steps.

5-1 Right click on the DB project and click "Publish"

5-2 "Edit" database connection strings, and browse to your desired database server, here I use Local DB. Also, you need to give a specific database name for this db.

5-3 Once connection string is set up, it's time to publish the DB

5-4 Check if the DB is correctly set up


6. Visual Studio also lets you save your publish settings as a "publish.xml" file so you can Load your saved publish profile when you try to publish your DB next time.


That's it. Hope you get to know a bit more about how to set up a Database project in Visual Studio. If you have any questions, please feel free to leave a comment and I'll reply it as soon as I'm available.

Thanks,
CHW

1.2.17

[Azure] How to use Open Broadcasting Software to do a live streaming with Azure Media Service

Here’s the tutorial of setting up Open Broadcast Software (OBS) as a streaming source to integrate with Azure Media Service
  1. Create a Channel & Program


  1. When Channel & Program are created and started, double click your created channel and copy the Primary Input URL:

  1. open Open Broadcasting Software, and hit Settings
At FMS URL: paste the ingest URL, which you just copy from Azure Media Explorer
At Play Path/Stream Key: type “mystream1”

Set KeyFrame Interval to 2

Then click OK to save every settings, and you are good to start broadcasting now.

At the Azure Media Explorer, you can preview the live streaming content.


[NoSQL] Installing Cassandra quick note

Cassandra is no doubt one of the hottest choice when you are considering using NoSQL db. I’ll explain what’s the benefit of NoSQL and will compare some popular NoSQL in later posts. Let’s get your hands dirty and play with it first!
I thought it will be very easy install it, however, if you don’t familiar with Linux, it will probably take some time.
  • Download Cassandra
browse Cassandra wiki page, and choose your preference to build it (DownloadDebianPackagingBuild), of course, the fastest way is to download it. for me, I prefer to move the directory to /usr/local/cassandra along with mysql or other applications.
  • Check your JDK and Ant version
please be notes that, in the latest version (2.0.4), it requires the minimum version of JDK, ANT and Git(if you want to build it yourself)
Tool
Version

Java SDK
1.7 (preferably the latest)

ANT
At least version 1.8

GIT
1.7
  • Config Cassandra
check it in cassandra’s directory, you can config it by changing  the yaml file: conf/cassandra.yaml, please note that you need to make sure these directories are matched and are created data_file_directories (/var/lib/cassandra/data), commitlog_directory (/var/lib/cassandra/commitlog), and saved_caches_directory (/var/lib/cassandra/saved_caches).
  • Test it
If it was all set, you can simply start cassandra by typing  bin/cassandra -f  in your cassandra home directory (/usr/local/cassandra) in my environment for example. And you can create a simple Namespace and table by following the instructions.
  • Develop with tools
There are a bunch of sdks that are available, so pick one by your language and enjoy your Cassandra journey! :)

[Azure] Media Service Node.js SDK and REST API

Azure Media Service is a great turn-key solution for your video-on-demand and live streaming needs. It’s has been well documented in the Azure official site, however, it’s still not much information talking about AMS Node.js SDK and the AMS REST API. So, I’m going to talk a little bit about it in this blog.
1.There’s no offical Node.js SDK yet
Now Azure Media Service provides the SDKs and tools below (abstract from official site):
Michelle’s Node project covers many of the functions, but it’s still missing some functions of Live Streaming. So if you need to use some live streaming functions, you can definitely leverage this.
2. How to make a successful call to AMS REST API using Node
There are many ways that you can test the API first, one of these is using POSTMAN. Note that you have to have an Azure subscription to do this.
You can follow this information to get your token back:
URL: https://wamsprodglobal001acs.accesscontrol.windows.net/v2/OAuth2-13
Method: POST
Headers:
Content-Type: application/x-www-form-urlencoded
Host: wamsprodglobal001acs.accesscontrol.windows.net
Content-Length: 120
Expect: 100-continue
Connection: Keep-Alive
Accept: application/json
Body: (choose x-www-form-urlencoded, which means it will encode your parameters automatically)
grant_type: client_credentials
client_id: [YOUR_AMS_CLIENTID]
client_secret: [YOUR_AMS_CLIENTSECRETE]
scope: urn:WindowsAzureMediaServices

if you’ve done it successfully, you will get the response like below:

and then you can use this access_token to operate AMS REST API.
if you want to implement it in Node.js, here are some tips that will save you some time.
a. if you follow the guide above and provide your header and body accordingly you might still encounter this error

{“error”:”invalid_client”,”error_description”:”ACS50012: Authentication failed.rnTrace ID: 621b507f-d2f5-4fc6-b208-9bafc83aba68rnCorrelation ID: 67435ae3-3f3f-485a-b58d-85f28eabf2c9rnTimestamp: 2016-01-06 08:32:42Z”}
so what to do then?
please modify the headers and body as below, then you should be able to get your token back. ðŸ™‚
Header:
‘accept’: ‘application/json;odata=verbose’,
‘Content-Type’: ‘application/json;odata=verbose’,
DataServiceVersion: ‘3.0’,
MaxDataServiceVersion: ‘3.0’,
‘x-ms-version’: ‘2.5’
Body:
scope: ‘urn:WindowsAzureMediaServices’,
grant_type: ‘client_credentials’,
client_id: ‘[YOUR_CLIENT_ID’,
client_secret: ‘[YOUR_CLIENT_SECRETE]’

3.APIs regarding live streaming
Please refer this document to operation Channels, and Programs…etc
I’ll find time to blog about this API.

[Azure] Application Insights X WordPress

When you have a blog or website, it is good to know where do your viewers come from. There are a lot of tools that can help you do that, such as Google Analytics, however, in this post, I’m going to introduce another tool that is also easy to use – Azure Application Insights.
You can check out what is it and how to use it from here and here, I just want to add on one point, in the process to configure Tenant ID and Client ID, you should be notice that these two values are hard to find, please reference this post to find out Tenant ID.
you can find your tenant ID when navigate to the Active DirectoryApplication tab: check this out.


reference:

[Tool] Use PowerShell & Sublime to code

Sometimes it is faster to use command line to sync your code with Git, and  to navigate through the directories, however, there is no good tool in Windows to directly edit code in command line, like Vim, Vi in Linux. Thus, I searched about it and decided to use PowerShell & Sublime as the IDE for Node.js. (Although Visual Studio Enterprise and Code version is still the most frequent IDE that I use) here’s my suggestion of the most convenient way to code.
  1. Download a Sublime editor, this is the best text editor of all time.
  2. Navigate to System-> advanced settings -> and set the root folder of sublime into your PATH variables.
environment variable
3. Search for “cmd” and right click execute as administrator
4. Navigate to Sublime’s root folder and type “mklink sublime.exe sublime_text.exe”, and it’s done!
5. You can use Sublime to open a document in your command by simply typing “sublime xxx.txt”, sweet!
sublime

[Azure] How to host an affordable blog

This post is about hosting a Web site on Azure using its App Service, VMs and Go Daddy’s domain.
Well, of course, the first thing that I am going to share is how to create a blog by yourself! The prerequisite for this is an Azure account, and a domain name (Azure will has its custom domain for you if you don’t mind using an azurewebsites.net domain) There are just four steps to get there
Step 1: Create an Azure App Service
It’s a pretty easy and is broadly seen topic in the web, you can get a full tutorial from azure site: Create a WordPress Web App
Step 2: Set up a MySQL Database
I think it’s the most trouble step while doing this, since Azure only support ClearDB now for the default use of MySQL. So if you want to build your own MySQL DB engine for this purpose and for other use, it will take you for a while to configure it. Luckily, I found this great tutorial online, so it does save me lots of time (Configuring mysql server on Ubuntu in Azure).
Step 3: Set up a custom domain
Guess what, there’s also an official document talking about this (Configure a custom domain name in Azure App Service) The only thing I’m going to mention here is that you need to config your web sites in to at least a shared mode, so it will have this function enabled.
Step 4: Calculate your fee
Here’s a super sweet tools for you to easily see how much you will consume in the services you operate. Azure Pricing Calculator

It’s only cost me $23.06/month total for a professional blog, and you are able to manage your work load and computing powers on demand. How sweet is it?